Quote:
|
Home again
Returning to the Original question of this thread.
Recognizing the insight from O.B., Daryl and bucket from post reply #242 to present. Looks like a good uncompensated swing. Quote:
Following the rules: Flat left wrist that only cocks and uncocks, never bends or rolls. AND A bend right wrist that never cocks or rolls. From FIX to FOLLOW THROUGH. NOTE- all roll is assembly roll of the wedge assembly. an uncompensated stroke REQUIRES: swinging- horizontal hinge, requireing- a pitch right elbow and a slap onplane forearm JUST like Tiger picture. Likewise hitting will require punch right elbow and a fanning right forearm. Failing these elements, compensations are required. Note that he ap-pears to have "perfect" 90 degree wedges and #3 pp is on plane but "high aft" on the shaft- ie. still rotating to the aft side which it will not reach until impact. Horizontal hinging, sequenced release Now, assume assume he had arrived at the position of shaft level to the ground and parallel to the pl. With a punch elbow. pp#3 would be behind the shaft, on plane and the face perpendicular to the plane for ANGLED hinging. Now- switching a drag start down to a punch release fit well. Just get to the punch elbow. I know - HK wants CHOICES of components. But, would it not help many to say that uncompensated stroke requires a limited selection process? HB |
Quote:
|
Quote:
|
Been there, done that. I designed and built 3 Alignment Learning Aids to teach players how to Hinge and use the Right Forearm Angle of Approach. Dual Horizontal, Angled and Dual Vertical. You need only two Dowels and a coupler to connect them (or use your Left Hand)
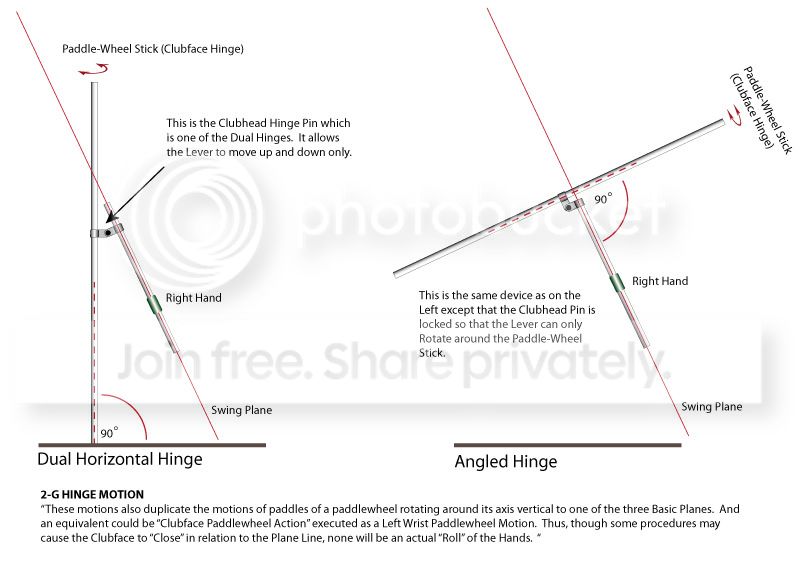 TO USE: Hold the "Paddle-Wheel" Stick Perpendicular to the Associated Plane with your Left Hand. With your Right Hand, Grip the Lever Stick at Impact Fix with your Right Forearm On-Plane and the #3 PP on the Aft Side of the Shaft. Move the "Lever" Stick back and forth with your Right Hand, Forearm and Elbow. NOTE: Grip the Lever firmly with your Right Hand with a Bent and Level Wrist. Don't allow the right hand to rotate as you move back and forth. This is Hinge Action. If you loosen your Right Hand Grip and Allow the hand to Rotate while the Lever Stick moves, then you're Swiveling. This teaches Hinge Action and the Right Forearm Angle of Approach for that Hinge Action(and much more). These devices will force you to Hinge through Impact and You CANNOT Swivel through Impact with these devices. I plan to introduce them in my video.  |
Nice D . Different point of view or machine so to speak from 1L but not inconsistent . Did you draw Vertical Hinging?
Sorry if this is getting away from the Right Forearm Angle of A.... |
Quote:
If the new member and his teacher would use one of the devices I created, the student would learn the Angle of Approach of the Right Forearm and begin Hinging immediately. No more Struggle and he would soon grasp that the Right Forearm Angle of Approach is the mother of the concepts in TGM. Homer Kelley knew this to be true: Quote:
|
Quote:
6-B-3-0 THE THIRD POWER ACCUMULATOR With true Throw-Out Action (no manual Clubface manipulation), Centrifugal Force automatically aligns the Clubshaft and Clubface for Horizontal Hinging (10-10-D) regardless of the Grip being used. And Ball Position (2-N) for straight-away flight must agree with the amount of “Hookface” designed into the Club, and is, therefore, unalterable except with manual override action or adjustment of the Plane Line. True “Drive Out” Action holds the Clubface in Impact Fix alignment (7-10) and automatically produces Angled Hinging (10-10-C). Study 7-3 and 10-11-0-3. Regardless of Lag Loading Procedure, Vertical Hinging (10-10-B) is a deliberate manual manipulation. Underline by Daryl. What is the difference between "Drive Out" as you have quoted and "Throw Out" like it says in the 7. edition? |
Quote:
|
Quote:
like your concept though... |
| All times are GMT -4. The time now is 07:44 PM. |
